User manualபயனர் கையேடு · Office: MastersOffice: முதன்மைப் பதிவுகள் (Masters)
Vendorசப்ளையர் (Vendor)
Add the companies you buy from, mark brands, pay their bills and see what you owe each one.நீங்க வாங்கும் நிறுவனங்களைச் சேர்க்க, பிராண்டுகளைக் குறிக்க, அவங்க பில்களுக்குப் பணம் செலுத்த, ஒவ்வொருவருக்கும் எவ்வளவு தரணும்னு பார்க்க.
- Where to find itஎங்கே இருக்கிறது
- Office → Masters → Vendor
- Who uses itயார் பயன்படுத்துவார்கள்
- Owner, Admin (Accountant can look)உரிமையாளர், நிர்வாகி (கணக்காளர் பார்க்க மட்டும் முடியும்)
A vendor is a company or stockist you buy from. This page holds each vendor's details and bank account, and shows what you owe them.
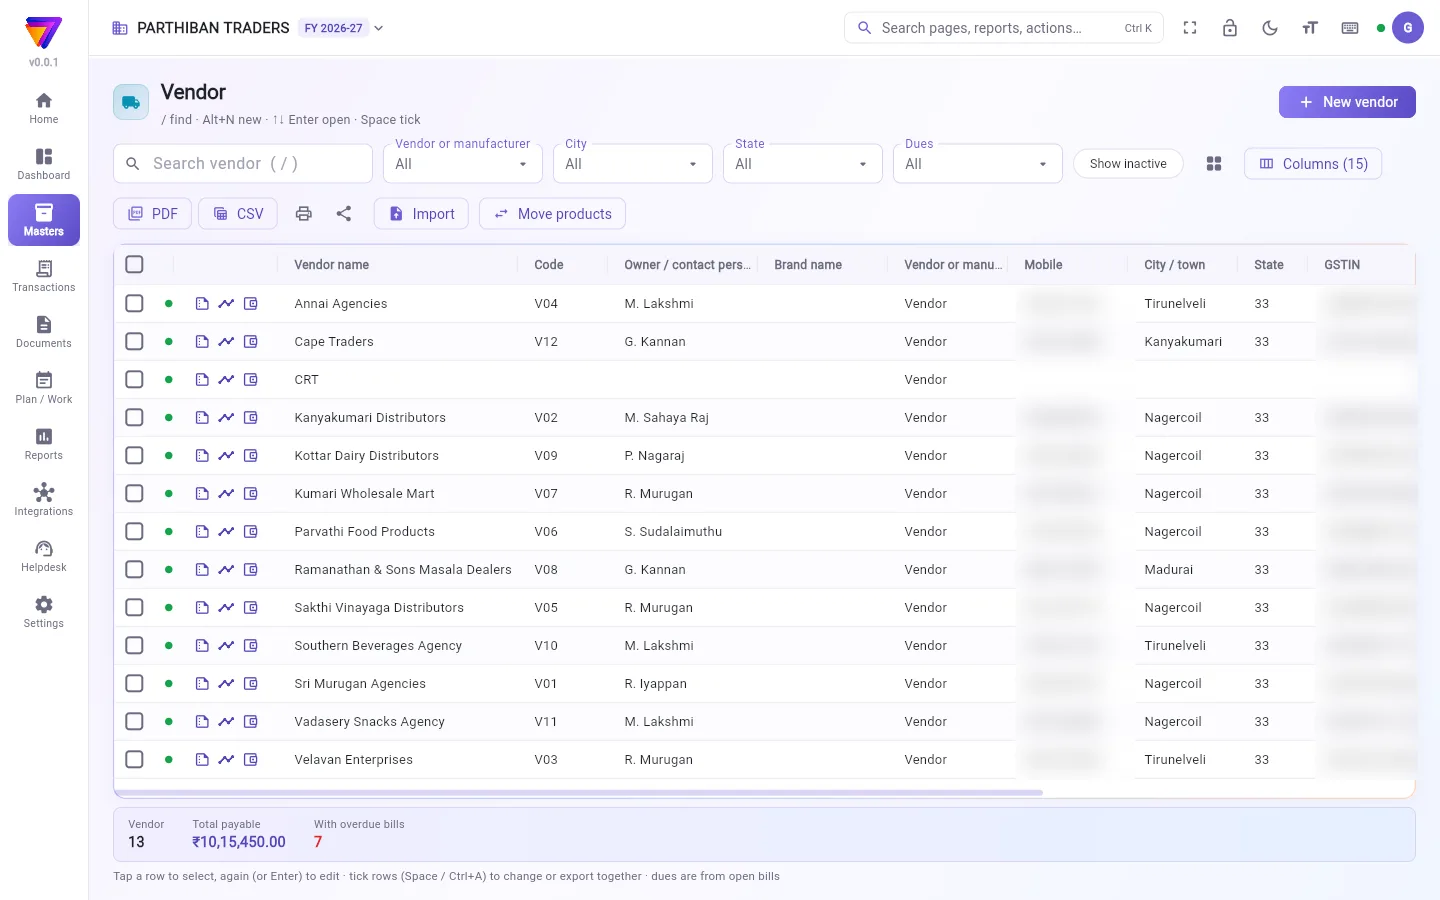
What you see
- New vendor at the top right.
- Filters: Vendor or manufacturer, City, State and Dues (We owe, Overdue).
- Import and Move products.
- Next to each name are three buttons: Summary, Ledger and Wallet.
- Columns include Vendor name, Code, Owner / contact person, Brand name, Vendor or manufacturer, Mobile, City / town, State, GSTIN, Payable, Open bills and Overdue days.
- The strip at the bottom shows the count, Total payable and With overdue bills.
Add a vendor
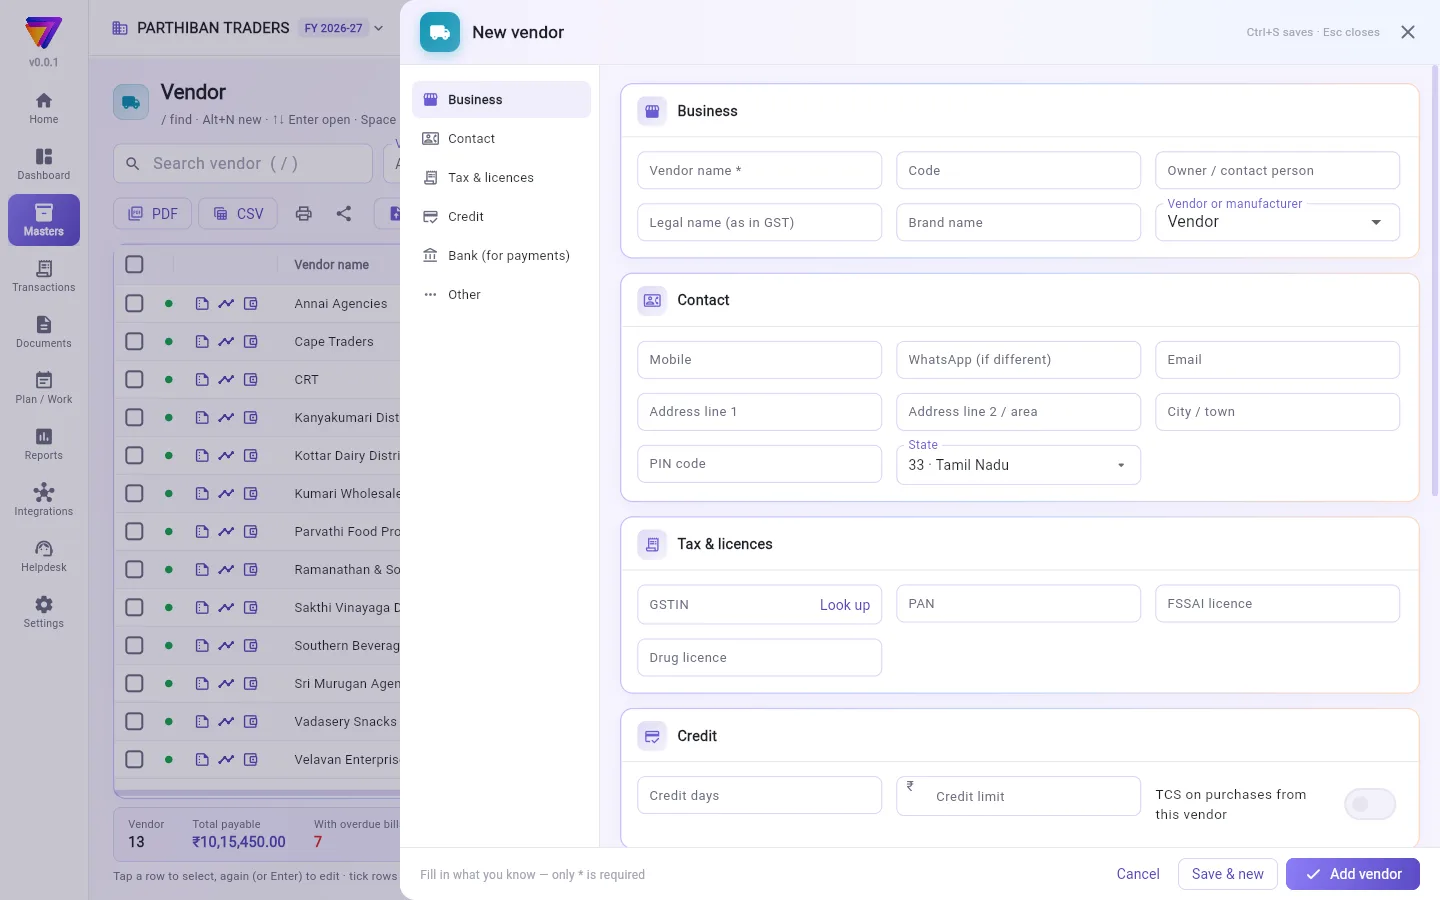
- Click New vendor.
- Type the Vendor name. It is the only required field.
- If the vendor has GST, type the full GSTIN and click Look up. Empty fields fill in from the GST record.
- If this vendor is a brand or manufacturer, set Vendor or manufacturer to Manufacturer / brand and type the Brand name.
- Fill in the bank details under Bank (for payments).
- Click Add vendor.
If the mobile number or GSTIN is already on another vendor, you see Looks like a duplicate. Click Save anyway only if it really is a different vendor.
Fields
| Field | What to enter |
|---|---|
| Vendor name * | The name on their bills. |
| Code, Owner / contact person, Legal name (as in GST) | Business details. |
| Brand name, Vendor or manufacturer | A Manufacturer / brand vendor shows up as a brand on products. |
| Mobile, WhatsApp (if different), Email | Contact details. |
| Address line 1, Address line 2 / area, City / town, PIN code, State | The address. |
| GSTIN, PAN, FSSAI licence, Drug licence | Tax and licence numbers. A GSTIN sets the State. |
| Credit days, Credit limit | Their credit terms. |
| TCS on purchases from this vendor | Switch on if TCS applies. |
| Bank account no., IFSC, Bank, Branch, Account holder name | Where you pay them. |
| Shop / office photo, Remarks | Optional. |
| Active | Off hides the vendor from pickers and lists. |
Pay a vendor's bills
- Click the vendor's row once to select it.
- Click Pay bills.
- Pick the Mode (Cash, Bank transfer, UPI or Cheque) and the Cash account or Bank account. For a cheque, type the Cheque no.
- Type the amount in Pay against each open bill, oldest first. Pay all in full fills every bill.
- Click Save payment, then confirm. The payment is sent for posting and shows under Payments.
To pay before a bill comes, click Advance instead and type the Amount. A bill cannot be paid more than its balance. Pay the extra as an advance.
Enter opening dues
- Select the vendor and click Opening balance.
- Click Add bill for each unpaid bill. Type the Bill no., Bill date and Pending amount.
- Leave Side on Balance. Pick Advance for money you paid them in advance.
- Click Save. Lines without a Bill no. are not saved.
Other actions on a selected vendor
- Edit, Statement and Delete.
- More: Summary (bills paid / unpaid), Wallet — set against bills / take back, Opening bills, Settle purchases from advance, Advance returned by vendor, Products bought from them and Correct balance.
Who can do what
- The Accountant role can view and export vendors. The Sales role does not see this page.
- Pay bills and Advance need the right to create payments. Opening balance needs Change opening balances.
Good to know
- Vendor is part of every plan, including Basic. Opening balance, Correct balance and the Wallet column use the Accounts module, which is not in Basic.
- Delete works only for a vendor that was never used. Otherwise you are offered Make inactive.
- Move products moves products from one vendor to another in one go.
Related
சப்ளையர் என்பது நீங்க பொருள் வாங்கும் ஒரு நிறுவனம் அல்லது ஸ்டாக்கிஸ்ட். இந்தப் பக்கத்தில் ஒவ்வொரு சப்ளையரின் விவரங்களும் வங்கிக் கணக்கும் இருக்கும், நீங்க அவங்களுக்கு எவ்வளவு தரணும் என்பதும் தெரியும்.
திரையில் என்ன தெரியும்
- மேல் வலது மூலையில் புதிய சப்ளையர் (New vendor).
- வடிகட்டிகள்: சப்ளையர் அல்லது தயாரிப்பாளர் (Vendor or manufacturer), ஊர் (City), மாநிலம் (State), நிலுவைகள் (Dues) (நாம் தர வேண்டும் (We owe), காலம் கடந்தது (Overdue)).
- இறக்குமதி (Import), பொருட்களை நகர்த்து (Move products).
- ஒவ்வொரு பெயருக்கும் பக்கத்தில் மூன்று பொத்தான்கள்: சுருக்கம் (Summary), பேரேடு (Ledger), வாலட் (Wallet).
- நெடுவரிசைகளில் சப்ளையர் பெயர் (Vendor name), குறியீடு (Code), உரிமையாளர் / தொடர்பு நபர் (Owner / contact person), பிராண்ட் பெயர் (Brand name), சப்ளையர் அல்லது தயாரிப்பாளர் (Vendor or manufacturer), மொபைல் (Mobile), நகரம் / ஊர் (City / town), மாநிலம் (State), GSTIN, தர வேண்டியது (Payable), நிலுவை பில்கள் (Open bills), காலம் கடந்த நாட்கள் (Overdue days) இருக்கும்.
- கீழே உள்ள பட்டையில் எண்ணிக்கை, மொத்தம் தர வேண்டியது (Total payable), காலம் கடந்த பில்கள் உள்ளவை (With overdue bills) தெரியும்.
ஒரு சப்ளையரைச் சேர்க்க
- புதிய சப்ளையர் (New vendor) கிளிக் பண்ணுங்க.
- சப்ளையர் பெயர் (Vendor name) டைப் பண்ணுங்க. கட்டாயம் தேவைப்படும் புலம் இது மட்டும்தான்.
- சப்ளையருக்கு GST இருந்தா, முழு GSTIN டைப் பண்ணி தேடிப் பார் (Look up) கிளிக் பண்ணுங்க. காலியான புலங்கள் GST பதிவிலிருந்து நிரம்பும்.
- இந்த சப்ளையர் ஒரு பிராண்ட் அல்லது தயாரிப்பாளர்னா, சப்ளையர் அல்லது தயாரிப்பாளர் (Vendor or manufacturer)-ஐ தயாரிப்பாளர் / பிராண்ட் (Manufacturer / brand) என்று அமைத்து பிராண்ட் பெயர் (Brand name) டைப் பண்ணுங்க.
- வங்கி (பணம் செலுத்த) (Bank (for payments)) கீழ் வங்கி விவரங்களை நிரப்புங்க.
- Add vendor (சப்ளையரைச் சேர்) கிளிக் பண்ணுங்க.
மொபைல் எண் அல்லது GSTIN ஏற்கனவே வேறொரு சப்ளையரிடம் இருந்தா, ஏற்கனவே உள்ளது போல் தெரிகிறது (Looks like a duplicate) வரும். அது உண்மையிலேயே வேற சப்ளையர்னா மட்டும் பரவாயில்லை, சேமி (Save anyway) கிளிக் பண்ணுங்க.
புலங்கள் (Fields)
| புலம் | என்ன உள்ளிடணும் |
|---|---|
| சப்ளையர் பெயர் (Vendor name) * | அவங்க பில்களில் உள்ள பெயர். |
| குறியீடு (Code), உரிமையாளர் / தொடர்பு நபர் (Owner / contact person), சட்டப்பூர்வ பெயர் (GST-இல் உள்ளபடி) (Legal name (as in GST)) | வணிக விவரங்கள். |
| பிராண்ட் பெயர் (Brand name), சப்ளையர் அல்லது தயாரிப்பாளர் (Vendor or manufacturer) | தயாரிப்பாளர் / பிராண்ட் (Manufacturer / brand) சப்ளையர், பொருட்களில் ஒரு பிராண்டாகத் தெரியும். |
| மொபைல் (Mobile), WhatsApp (வேறு எண் என்றால்) (WhatsApp (if different)), மின்னஞ்சல் (Email) | தொடர்பு விவரங்கள். |
| முகவரி வரி 1 (Address line 1), முகவரி வரி 2 / பகுதி (Address line 2 / area), நகரம் / ஊர் (City / town), PIN குறியீடு (PIN code), மாநிலம் (State) | முகவரி. |
| GSTIN, PAN, FSSAI உரிமம் (FSSAI licence), மருந்து உரிமம் (Drug licence) | வரி, உரிம எண்கள். GSTIN கொடுத்தா மாநிலம் (State) அமைஞ்சிடும். |
| கடன் நாட்கள் (Credit days), கடன் வரம்பு (Credit limit) | அவங்க கடன் நிபந்தனைகள். |
| இந்த விற்பனையாளரிடமிருந்து கொள்முதலில் TCS (TCS on purchases from this vendor) | TCS பொருந்தினா ஆன் பண்ணுங்க. |
| வங்கிக் கணக்கு எண் (Bank account no.), IFSC, வங்கி (Bank), கிளை (Branch), கணக்கு வைத்திருப்பவர் பெயர் (Account holder name) | அவங்களுக்குப் பணம் அனுப்பும் இடம். |
| கடை / அலுவலகப் புகைப்படம் (Shop / office photo), குறிப்புகள் (Remarks) | விருப்பப்பட்டால். |
| செயலில் (Active) | ஆஃப் பண்ணா, தேர்வுப் பட்டியல்களிலும் பட்டியல்களிலும் சப்ளையர் மறைஞ்சிடுவார். |
சப்ளையரின் பில்களுக்குப் பணம் செலுத்த
- சப்ளையரின் வரியை ஒரு தடவை கிளிக் பண்ணித் தேர்ந்தெடுங்க.
- பில்களைச் செலுத்து (Pay bills) கிளிக் பண்ணுங்க.
- முறை (Mode) (ரொக்கம் (Cash), வங்கிப் பரிமாற்றம் (Bank transfer), UPI அல்லது காசோலை (Cheque)), அதோடு ரொக்கக் கணக்கு (Cash account) அல்லது வங்கிக் கணக்கு (Bank account) தேர்ந்தெடுங்க. காசோலைன்னா காசோலை எண் (Cheque no.) டைப் பண்ணுங்க.
- ஒவ்வொரு திறந்த பில்லுக்கும் எதிரே செலுத்து (Pay)-இல் தொகையை டைப் பண்ணுங்க, பழைய பில் முதலில். அனைத்தையும் முழுமையாகச் செலுத்து (Pay all in full) எல்லா பில்களையும் நிரப்பும்.
- பணம் செலுத்துதலைச் சேமி (Save payment) கிளிக் பண்ணி, உறுதி செய்யுங்க. பணம் செலுத்துதல் பதிவுக்கு அனுப்பப்பட்டு, பணம் செலுத்துதல்கள் (Payments) கீழ் தெரியும்.
பில் வருவதற்கு முன்பே செலுத்தணும்னா, அதுக்குப் பதிலா முன்பணம் (Advance) கிளிக் பண்ணி தொகை (Amount) டைப் பண்ணுங்க. ஒரு பில்லுக்கு அதன் நிலுவையை விட அதிகமா செலுத்த முடியாது. கூடுதல் தொகையை முன்பணமாகச் செலுத்துங்க.
தொடக்க நிலுவைகளை உள்ளிட
- சப்ளையரைத் தேர்ந்தெடுத்து தொடக்க இருப்புத் தொகை (Opening balance) கிளிக் பண்ணுங்க.
- செலுத்தாத ஒவ்வொரு பில்லுக்கும் பில் சேர் (Add bill) கிளிக் பண்ணுங்க. பில் எண் (Bill no.), பில் தேதி (Bill date), நிலுவையில் (Pending) தொகையை டைப் பண்ணுங்க.
- பக்கம் (Side)-ஐ இருப்புத் தொகை (Balance)-லேயே விடுங்க. நீங்க அவங்களுக்கு முன்பணமா கொடுத்த பணத்துக்கு முன்பணம் (Advance) தேர்ந்தெடுங்க.
- சேமி (Save) கிளிக் பண்ணுங்க. பில் எண் (Bill no.) இல்லாத வரிகள் சேமிக்கப்படாது.
தேர்ந்தெடுத்த சப்ளையரில் மற்ற செயல்கள்
- திருத்து (Edit), கணக்கு அறிக்கை (Statement), நீக்கு (Delete).
- மேலும் (More): சுருக்கம் (செலுத்திய / செலுத்தாத பில்கள்) (Summary (bills paid / unpaid)), வாலட் — பில்களுக்கு எதிராக வை / திரும்பப் பெறு (Wallet — set against bills / take back), தொடக்க பில்கள் (Opening bills), முன்பணத்திலிருந்து கொள்முதல்களைத் தீர் (Settle purchases from advance), சப்ளையர் திருப்பிய முன்பணம் (Advance returned by vendor), Products bought from them (அவங்களிடம் வாங்கிய பொருட்கள்), மீதத்தைத் திருத்து (Correct balance).
யார் என்ன செய்யலாம்
- கணக்காளர் பணிப்பொறுப்பு சப்ளையர்களைப் பார்க்கலாம், ஏற்றுமதி செய்யலாம். விற்பனை பணிப்பொறுப்புக்கு இந்தப் பக்கம் தெரியாது.
- பில்களைச் செலுத்து (Pay bills), முன்பணம் (Advance)-க்கு பணம் செலுத்துதல் உருவாக்கும் அனுமதி வேணும். தொடக்க இருப்புத் தொகை (Opening balance)-க்கு தொடக்க இருப்புகளை மாற்று (Change opening balances) அனுமதி வேணும்.
தெரிந்துகொள்ள வேண்டியது
- Basic உட்பட எல்லா பிளான்களிலும் சப்ளையர் பக்கம் இருக்கு. தொடக்க இருப்புத் தொகை (Opening balance), மீதத்தைத் திருத்து (Correct balance), வாலட் (Wallet) நெடுவரிசை கணக்குகள் (Accounts) தொகுதியைப் பயன்படுத்துது; அது Basic-இல் இல்லை.
- ஒருபோதும் பயன்படுத்தாத சப்ளையருக்கு மட்டும் நீக்கு (Delete) வேலை செய்யும். இல்லைன்னா செயலற்றதாக்கு (Make inactive) காட்டப்படும்.
- பொருட்களை நகர்த்து (Move products) ஒரு சப்ளையரிடமிருந்து இன்னொருவருக்குப் பொருட்களை ஒரே தடவையில் மாற்றும்.
தொடர்புடையவை
- பொருள் (Product): வாங்கும் இடம் (முக்கிய சப்ளையர்) (Bought from (main vendor)), பிராண்ட் (Brand)
- கொள்முதல் (Purchase): ஒரு சப்ளையரின் பில்லை உள்ளிட
- பணம் செலுத்துதல்கள் (Payments): நீங்க செலுத்திய பணத்தைப் பார்க்க