User manualபயனர் கையேடு · Office: TransactionsOffice: பரிவர்த்தனைகள் (Transactions)
Expensesசெலவுகள் (Expenses)
Record money spent on rent, fuel, wages and other costs, with GST if the bill has it.வாடகை, எரிபொருள், கூலி போன்ற செலவுகளைப் பதிவு செய்ய; பில்லில் GST இருந்தால் அதையும் சேர்த்து.
- Where to find itஎங்கே இருக்கிறது
- Office → Transactions → Expenses
- Who uses itயார் பயன்படுத்துவார்கள்
- Accountant, office staffகணக்காளர், அலுவலக ஊழியர்கள்
An expense records money spent on running the business: rent, fuel, electricity, loading charges and so on. One expense can have several lines, each with its own account and GST.
What you see
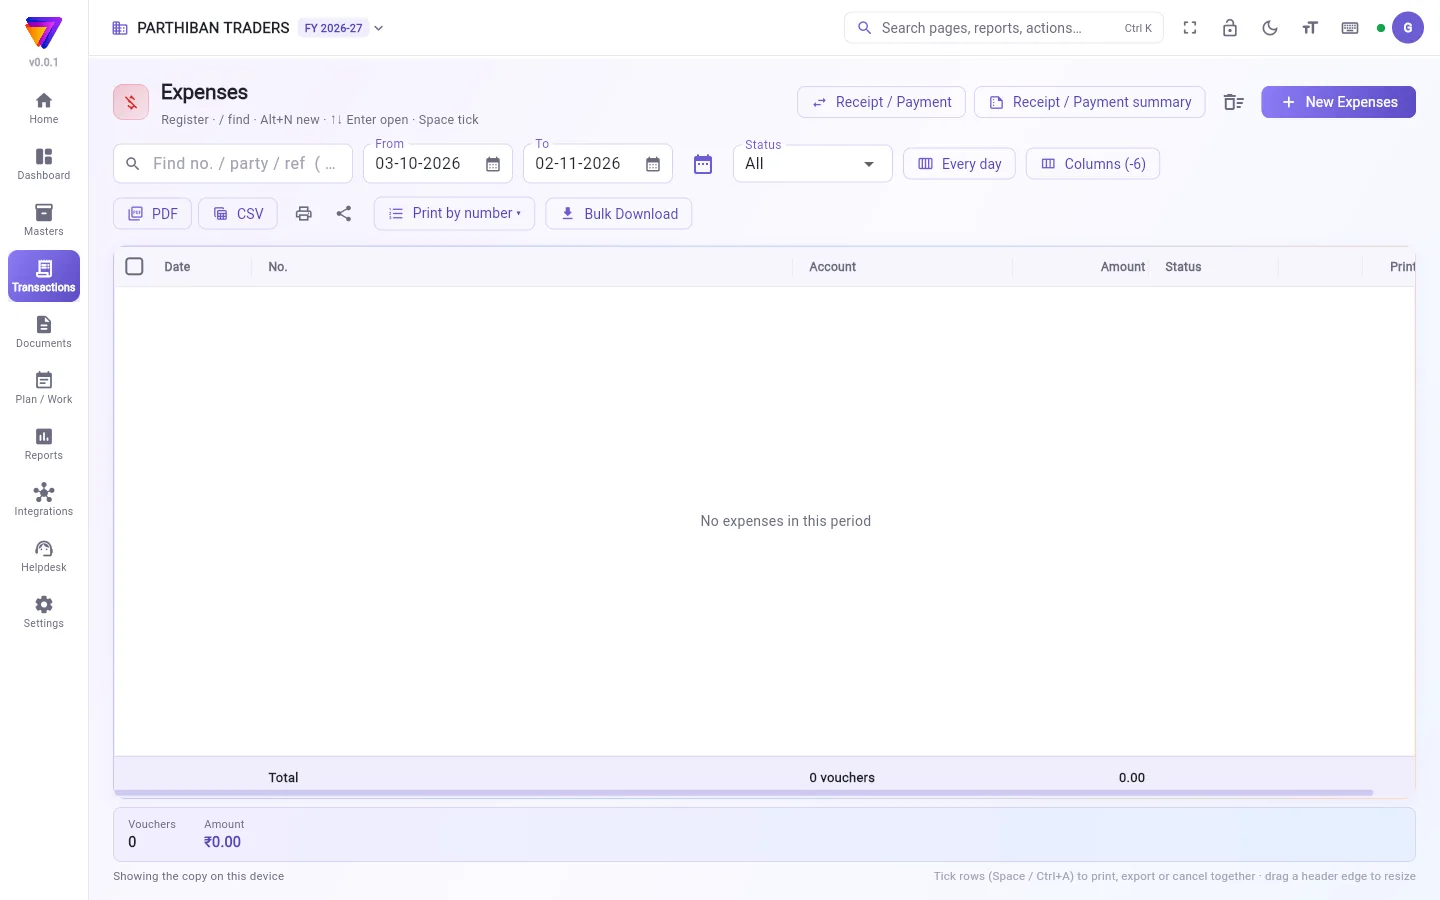
The register lists your expenses, numbered E/0001, E/0002 and so on, with the Amount of each. It works like every other voucher register. See The register: finding, filtering and exporting bills.
This register also has:
- an Expense head filter, to see one kind of expense.
- Receipt / Payment: give money to an account, or take it back (see below).
- Receipt / Payment summary: what went out to each account and what came back, for a period.
Record an expense
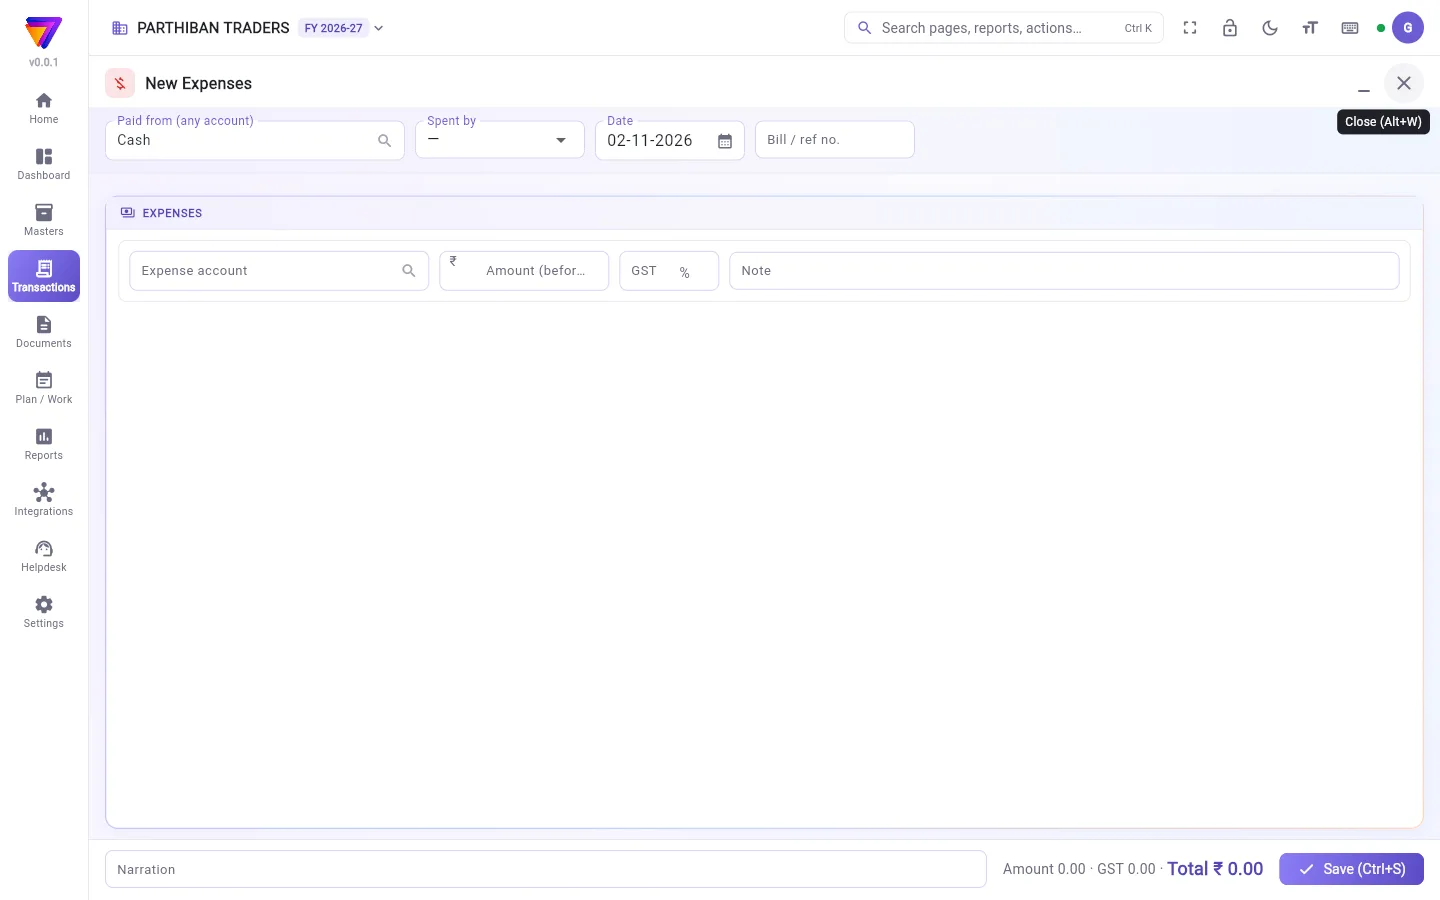
- Click New Expenses.
- In Paid from (any account), choose where the money came from. It starts on Cash.
- In Spent by, choose the employee who spent it, if any.
- Check the Date. Enter the Bill / ref no. if there is one.
- On each line:
- choose the Expense account,
- enter the Amount (before GST),
- enter the GST rate if the bill has GST,
- add a Note if you want.
- Check the Total ₹ at the bottom.
- Click Save (Ctrl+S).
What it posts
- Each expense account is debited with its amount before GST.
- The GST goes to input GST (CGST and SGST, or IGST if the vendor is in another state).
- The Paid from account is credited with the total.
- If Paid from is a vendor's account, the expense stays open as a bill you owe that vendor. You settle it later from Payments.
Fields
| Field | What to enter |
|---|---|
| Paid from (any account) | Cash, a bank, a vendor, or another account such as an employee's advance. Required. |
| Expense account | What the money was spent on. Required on each line. It cannot be cash or bank, and it cannot be the Paid from account. |
| Amount (before GST) | The amount on the bill before tax. |
| GST | The GST rate on the bill, if any. |
| Spent by | The employee who spent it. |
| Bill / ref no. | The number on the shop's bill. |
| Note, Narration | Optional text. |
Give or take back money with Receipt / Payment
Use this for money that is not an expense, such as an advance to a driver or a deposit.
- Click Receipt / Payment.
- Choose Payment (money goes out) or Receipt (money comes back).
- Choose the account in Paid to (account) or Received from (account). Clients and vendors are not listed; they have their own collections and payments.
- Choose the cash or bank account, the Date and the Amount.
- Choose who is Responsible, and add Remarks (optional).
- To enter more than one, tick Keep open after saving.
- Click Create Payment or Create Receipt.
This saves a Payment or a Receipt voucher, not an expense.
Good to know
- Available on Pro, Pro · Large Stockist and Enterprise.
- To move money between cash and bank, use Contra. An expense line on a cash or bank account is refused.
- An expense with Spent by set, paid from a cash account, comes off that person's cash closing.
- Field staff can also add expenses from the Score app. They are saved here with their name in Spent by.
Related
- Contra: move money between cash and bank.
- Payments: pay a vendor for an expense on credit.
- Cash Closing: a salesman's cash for the day.
- Accounts: add expense accounts.
தொழில் நடத்தச் செலவான பணத்தை செலவு பதிவு செய்யும்: வாடகை, எரிபொருள், மின்சாரம், லோடிங் கூலி போன்றவை. ஒரு செலவில் பல வரிகள் இருக்கலாம்; ஒவ்வொரு வரிக்கும் தனிக் கணக்கும் GST-யும் உண்டு.
திரையில் என்ன தெரியும்
பதிவேட்டில் உங்கள் செலவுகள் E/0001, E/0002 என்று எண்ணுடன், ஒவ்வொன்றின் தொகை (Amount)-யுடன் வரும். மற்ற எல்லா வவுச்சர் பதிவேடுகளையும் போலவே இதுவும் வேலை செய்யும். பார்க்க: பதிவேடு: பில்களைத் தேடுவது, வடிகட்டுவது, ஏற்றுமதி செய்வது.
இந்தப் பதிவேட்டில் கூடுதலாக:
- செலவுத் தலைப்பு (Expense head) வடிகட்டி: ஒரு வகைச் செலவை மட்டும் பார்க்க.
- வசூல் / பணம் செலுத்துதல் (Receipt / Payment): ஒரு கணக்குக்குப் பணம் கொடுக்க, அல்லது திரும்ப வாங்க (கீழே பாருங்க).
- ரசீது / பணம் செலுத்துதல் சுருக்கம் (Receipt / Payment summary): ஒரு காலத்தில் ஒவ்வொரு கணக்குக்கும் போனது எவ்வளவு, திரும்ப வந்தது எவ்வளவு.
செலவைப் பதிவு செய்வது
- New Expenses (புதிய செலவு) அழுத்துங்க.
- செலுத்திய கணக்கு (எந்தக் கணக்கும்) (Paid from (any account))-இல், பணம் எங்கிருந்து போனது என்று தேர்ந்தெடுங்க. இது ரொக்கம் (Cash)-இல் தொடங்கும்.
- செலவு செய்தவர் (Spent by)-இல், செலவு செய்த பணியாளரைத் தேர்ந்தெடுங்க (இருந்தால்).
- தேதி (Date)-ஐச் சரிபாருங்க. பில் / குறிப்பு எண் (Bill / ref no.) இருந்தால் உள்ளிடுங்க.
- ஒவ்வொரு வரியிலும்:
- செலவுக் கணக்கு (Expense account) தேர்ந்தெடுங்க,
- தொகை (GST க்கு முன்) (Amount (before GST)) உள்ளிடுங்க,
- பில்லில் GST இருந்தால் GST விகிதத்தை உள்ளிடுங்க,
- வேண்டுமென்றால் குறிப்பு (Note) சேருங்க.
- கீழே உள்ள Total ₹ (மொத்தம் ₹)-ஐச் சரிபாருங்க.
- சேமி (Ctrl+S) (Save (Ctrl+S)) அழுத்துங்க.
கணக்கில் என்ன பதிவாகும்
- ஒவ்வொரு செலவுக் கணக்கும் GST க்கு முந்தைய தொகையுடன் பற்று (debit) ஆகும்.
- GST உள்ளீட்டு GST-க்குப் போகும் (CGST, SGST; சப்ளையர் வேறு மாநிலத்தில் இருந்தால் IGST).
- செலுத்திய கணக்கு (Paid from) மொத்தத் தொகையுடன் வரவு (credit) ஆகும்.
- செலுத்திய கணக்கு (Paid from) ஒரு சப்ளையரின் கணக்காக இருந்தால், அந்தச் செலவு அந்த சப்ளையருக்கு நீங்கள் தர வேண்டிய பில்லாகத் திறந்தே இருக்கும். பிறகு பணம் செலுத்துதலில் அதைத் தீர்க்கலாம்.
புலங்கள் (Fields)
| புலம் | என்ன உள்ளிட வேண்டும் |
|---|---|
| செலுத்திய கணக்கு (எந்தக் கணக்கும்) (Paid from (any account)) | ரொக்கம், வங்கி, சப்ளையர், அல்லது பணியாளரின் முன்பணம் போன்ற வேறு கணக்கு. கட்டாயம். |
| செலவுக் கணக்கு (Expense account) | பணம் எதற்குச் செலவானது. ஒவ்வொரு வரியிலும் கட்டாயம். இது ரொக்கம் அல்லது வங்கியாக இருக்கக் கூடாது; செலுத்திய கணக்கு (Paid from)-ஆகவும் இருக்கக் கூடாது. |
| தொகை (GST க்கு முன்) (Amount (before GST)) | வரிக்கு முன் பில்லில் உள்ள தொகை. |
| GST | பில்லில் உள்ள GST விகிதம், இருந்தால். |
| செலவு செய்தவர் (Spent by) | செலவு செய்த பணியாளர். |
| பில் / குறிப்பு எண் (Bill / ref no.) | கடையின் பில்லில் உள்ள எண். |
| குறிப்பு, விளக்கம் (Note, Narration) | விருப்ப உரை. |
வசூல் / பணம் செலுத்துதல் மூலம் பணம் கொடுப்பது அல்லது திரும்ப வாங்குவது
செலவு இல்லாத பணத்துக்கு இதைப் பயன்படுத்துங்க, உதாரணமாக டிரைவருக்கு முன்பணம் அல்லது டெபாசிட்.
- வசூல் / பணம் செலுத்துதல் (Receipt / Payment) அழுத்துங்க.
- பணம் செலுத்துதல் (Payment) (பணம் வெளியே போகும்) அல்லது வசூல் (Receipt) (பணம் திரும்ப வரும்) தேர்ந்தெடுங்க.
- Paid to (account) (செலுத்தியது (கணக்கு)) அல்லது Received from (account) (பெற்றது (கணக்கு))-இல் கணக்கைத் தேர்ந்தெடுங்க. வாடிக்கையாளர்களும் சப்ளையர்களும் இதில் வர மாட்டார்கள்; அவர்களுக்குத் தனியாக வசூலும் பணம் செலுத்துதலும் உண்டு.
- ரொக்கம் அல்லது வங்கிக் கணக்கு, தேதி (Date), தொகை (Amount) தேர்ந்தெடுங்க.
- பொறுப்பாளர் (Responsible) யார் என்று தேர்ந்தெடுங்க; குறிப்புகள் (விருப்பம்) (Remarks (optional)) சேருங்க.
- ஒன்றுக்கு மேல் உள்ளிட, சேமித்த பின் திறந்தே வை (Keep open after saving)-ஐ டிக் செய்யுங்க.
- பணம் செலுத்துதலை உருவாக்கு (Create Payment) அல்லது ரசீதை உருவாக்கு (Create Receipt) அழுத்துங்க.
இது ஒரு பணம் செலுத்துதல் அல்லது வசூல் வவுச்சராகச் சேமிக்கப்படும், செலவாக அல்ல.
தெரிந்துகொள்ள வேண்டியது
- Pro, Pro · பெரிய ஸ்டாக்கிஸ்ட், Enterprise பிளான்களில் கிடைக்கும்.
- ரொக்கத்துக்கும் வங்கிக்கும் இடையே பணத்தை மாற்ற கான்ட்ரா பயன்படுத்துங்க. ரொக்க அல்லது வங்கிக் கணக்கில் செலவு வரி போட்டால் மறுக்கப்படும்.
- செலவு செய்தவர் (Spent by) அமைத்து, ரொக்கக் கணக்கிலிருந்து செலுத்திய செலவு, அந்த நபரின் ரொக்க முடிவில் கழிக்கப்படும்.
- களப் பணியாளர்கள் Score ஆப்பிலிருந்தும் செலவுகளைச் சேர்க்கலாம். அவை இங்கே செலவு செய்தவர் (Spent by)-இல் அவர்கள் பெயருடன் சேமிக்கப்படும்.
தொடர்புடையவை
- கான்ட்ரா: ரொக்கத்துக்கும் வங்கிக்கும் இடையே பணம் மாற்ற.
- பணம் செலுத்துதல்கள்: கடனில் வந்த செலவுக்கு சப்ளையருக்குப் பணம் செலுத்த.
- ரொக்க முடிவு: விற்பனைப் பிரதிநிதியின் அன்றைய ரொக்கம்.
- கணக்குகள்: செலவுக் கணக்குகளைச் சேர்க்க.